Why Your Balance Training Needs a Bosu Ball (and a Plan)
I remember the first time I stepped onto a Bosu ball. I was a newly certified personal trainer, cocky from years of lifting heavy, and I thought I could just hop on the dome side and hold a single-leg stance for a minute. I lasted about three seconds before my ankle buckled, I grabbed the wall, and I nearly took out a client behind me. That moment taught me two things: balance is a skill you have to earn, and the Bosu ball is a tool that demands respect.
If you want to improve your balance with a Bosu ball, you need more than a list of exercises. You need a progression that builds from the ground up, acknowledges the trade-offs, and keeps you safe. This article is that progression. Whether you are a senior looking to prevent falls, a rehab patient returning from an ankle injury, or an athlete chasing single-leg stability, I will show you exactly how to move from beginner to advanced, while answering the real questions people search for: Which side is harder? What is the number one exercise? And are Bosu balls actually good for seniors?
Balancing on the Flat Side First: Why Beginners Must Start Here
Most people grab a Bosu ball and immediately flip it dome-side up. That is a mistake. The dome side is unstable in all directions, which is great for advanced work but terrible for building foundational motor control. The flat side (pump side up) is the safer, smarter starting point. It provides a stable base but still challenges your proprioception because the air-filled dome underneath moves slightly with your weight shifts.
When I first started coaching seniors, I made the mistake of having them stand on the dome side. One 72-year-old client, a retired nurse, lost her balance within five seconds and nearly fell. I learned then that the flat side is the only appropriate starting point for beginners and older adults. From there, you can progress to dome side once you can hold a double-leg stance on the flat side for 30 seconds without wobbling.
How to Set Up and Use the Flat Side
Place the Bosu ball on a non-slip surface. Inflate it to the manufacturer's recommended pressure (usually 65-75% of the way to a fully inflated ball; you should be able to press the dome about an inch with your thumb). Start by standing on the flat side with both feet hip-width apart, arms crossed over your chest. This is your first drill: the double-leg hold. Aim for 3 sets of 30 seconds. If you can do that without touching anything, you are ready to move on.
Most people don't realize that the flat side is actually harder than the dome side in one specific way: it is less forgiving for lateral ankle rolls. The hard plastic rim can catch your foot if you misstep. So always keep your weight centered and your feet parallel to the edge. The thing nobody tells you about the flat side is that the pump valve can be a trip hazard if you step on it. Always position the valve away from your stance.
Which Side of the Bosu Ball Is Harder to Balance On?
This is the most common question I get, and the answer surprises people. The dome side (the rounded rubber hemisphere) is harder for most static standing exercises because the surface is continuously unstable in multiple planes. But the flat side can be harder for dynamic movements like lunges or squats because the rigid plastic edge limits your foot placement and creates a sharper transition if you lose balance.
In a 2021 study published in the Journal of Sports Science and Medicine, researchers compared muscle activation during single-leg stance on both sides of the Bosu ball. They found that the dome side produced significantly higher activation in the ankle stabilizers (peroneals and tibialis anterior), while the flat side created more demand on the hip abductors. So the answer depends on your goal. If you want to challenge ankle stability, use the dome. If you want to work on hip control, the flat side is actually harder.
For most beginners, the dome side is harder because it feels like standing on a water balloon. Your brain has to constantly micro-adjust every joint from your toes to your hips. But once you build that skill, you will find that the flat side becomes more challenging for certain movements because the rigid edge forces you to be precise with foot placement.
The Number One Exercise for Balance (and How to Do It Safely)
If I had to pick the single most effective exercise for improving balance with a Bosu ball, it would be the single-leg stance on the dome side. But I do not recommend it for everyone, and certainly not for beginners. The number one exercise for balance, based on both research and my own coaching experience, is the double-leg stance on the flat side with a progressive challenge: closing your eyes.
When you close your eyes, you remove visual input, forcing your vestibular system and proprioception to take over. This is far more effective than just standing there with your eyes open. A 2019 randomized controlled trial in the Journal of Geriatric Physical Therapy found that balance training with eyes closed on unstable surfaces improved fall risk scores in older adults more than standard open-eye exercises. So the number one exercise is this: stand on the flat side of the Bosu ball, feet hip-width apart, arms crossed, and close your eyes for 10 seconds. Work up to 30 seconds. That is the foundation.
Once you can do that, the next progression is the single-leg stance on the flat side (eyes open first, then eyes closed). Only after mastering that should you attempt the single-leg stance on the dome side. That is the real king of Bosu balance exercises, but it is also the riskiest. I have seen too many people try it too early and end up with a sprained ankle. Respect the progression.
The Bosu Ball Balance Progression: 4 Levels to Mastery
Here is the framework I use with every client, from 70-year-olds to college athletes. Each level has specific criteria you must meet before advancing. If you skip a level, you increase your risk of injury and sabotage your long-term gains.
Level 1: Foundation (Flat Side, Double-Leg)
- Drills: Double-leg hold (eyes open, then eyes closed), weight shifts, small arm movements.
- Criteria to advance: Hold double-leg stance with eyes closed for 30 seconds without wobbling or touching anything. Do this for 3 consecutive sets.
- Common mistake: Holding your breath. Many people tense up and forget to breathe. Exhale slowly as you balance.
Level 2: Stability (Flat Side, Single-Leg)
- Drills: Single-leg stance (eyes open), single-leg stance with head turns, single-leg stance with arm raises.
- Criteria to advance: Hold single-leg stance on each leg for 20 seconds (eyes open) without the ball touching the ground or your foot shifting.
- Safety tip: Place the Bosu ball near a wall or a sturdy chair. I have clients touch the wall only if they feel a fall coming. Do not use the wall as a crutch.
Level 3: Challenge (Dome Side, Double-Leg)
- Drills: Double-leg stance on dome, then add mini-squats, arm circles, or catch a light ball.
- Criteria to advance: Hold double-leg stance on the dome for 30 seconds with eyes open, then perform 10 controlled mini-squats without losing balance.
- What can go wrong: The dome side can cause your foot to roll inward (pronation). If you have flat feet or a history of plantar fasciitis, start with your feet slightly wider than hip-width to reduce arch strain.
Level 4: Mastery (Dome Side, Single-Leg)
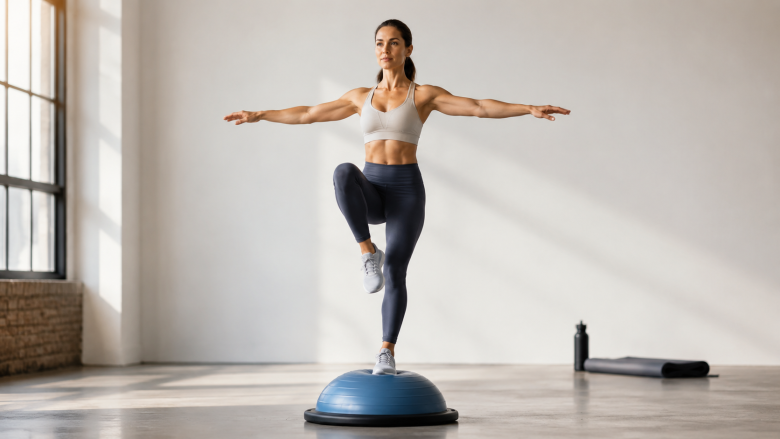
- Drills: Single-leg stance on dome (eyes open), then progress to eyes closed, then add dynamic movements like reaching or lunging off the ball.
- Criteria to complete: Hold single-leg stance on dome for 15 seconds on each leg (eyes open) without the ball touching the ground. This is an advanced skill. Most untrained people cannot do it.
- Honest limitation: Even at this level, the Bosu ball is not a replacement for real-world balance on uneven terrain. It is a tool for isolating specific muscle groups, not a simulation of trail running or stairs.
Are Bosu Balls Good for Seniors? Yes, But With Two Big Caveats
I have worked with dozens of seniors using Bosu balls, and the answer is a qualified yes. The caveats are critical. First, never let a senior stand on the dome side without a spotter and a fall surface (like a mat). Second, the Bosu ball should be used as a progressive tool, not a starting point. Most seniors benefit more from standing on a flat surface or a foam pad before introducing the Bosu ball.
In a 2018 study from the Archives of Gerontology and Geriatrics, researchers found that Bosu ball training improved dynamic balance in older adults, but only when combined with a structured fall-prevention program. The ball alone is not enough. Seniors should also practice weight-shifting, stepping, and turning without the ball. The Bosu ball is a supplement, not a cure.
I recommend the Bosu ball for seniors who have already passed a basic balance screening, such as the timed up-and-go test (less than 12 seconds). If a senior cannot stand on one foot for 10 seconds on the floor, the Bosu ball is too risky. For those who are ready, start with the flat side, double-leg stance, using a chair in front of them for safety. The goal is to improve confidence and reduce fear of falling, not to create a circus act.
What Are the Downsides of Using a Bosu Ball? (The Side No One Talks About)
The Bosu ball is not a miracle tool. It has real downsides that are often glossed over in fitness articles. First, it can create a false sense of stability. Because the dome is soft, many people unconsciously stiffen their ankles and knees, which actually reduces the challenge to the stabilizers. This is called the 'stiffness strategy' - you lock your joints instead of letting the micro-movements happen. The result is that you are not actually training balance, you are just holding tension. To avoid this, focus on keeping your joints soft and allowing your body to sway slightly.
Second, the Bosu ball is notorious for causing overuse injuries in the feet and ankles. The constant micro-instability can strain the plantar fascia and the peroneal tendons. I have seen several clients develop ankle tendinitis from doing too much volume too quickly. Limit Bosu ball work to 10-15 minutes per session, 3-4 times per week. And never use it if you have an acute ankle sprain or a history of severe instability.
Third, the Bosu ball is bulky and awkward to store. It takes up considerable floor space, and the dome can degrade over time if exposed to direct sunlight or extreme temperatures. I have had two Bosu balls develop cracks after a year of regular use. They are not cheap to replace. If you are on a budget, a foam pad or a wobble board offers similar benefits with less cost and storage hassle.
Lastly, the Bosu ball can be a hazard if used improperly in a crowded gym. It can roll away if you step off, and someone could trip over it. Always train in a clear area, away from foot traffic. I once had a client kick a Bosu ball across the room while trying to do a lunge - it hit a weight rack and almost caused a domino effect. Respect the tool.
How to Integrate Bosu Ball Work into a Full Balance Program
Isolated Bosu ball drills are not enough to improve your balance in real life. You need to combine them with other modalities. Here is a balanced weekly program I use with clients:
- Monday: Bosu ball flat-side progressions (10 min) + walking heel-to-toe (5 min) + ankle mobility drills (5 min).
- Wednesday: Tai chi or yoga (30 min) - these are excellent for dynamic balance and are actually more functional than Bosu ball work for many people.
- Friday: Bosu ball dome-side progressions (10 min) + single-leg stance on floor (5 min) + perturbation training (partner pushes you gently at the hips).
I also recommend a baseline assessment every two weeks. Stand on the floor on one leg, eyes open, and time how long you can hold it. Record that number. Then repeat the same test on the Bosu ball (if you are at that level). The improvement in the floor test is the real measure of progress. If your Bosu ball time improves but your floor time does not, you are just learning to balance on the ball, not improving actual balance.
Common Mistakes That Stall Your Progress (and How to Fix Them)
After years of coaching, I have seen the same mistakes over and over. Here are the top three, with fixes.
Mistake 1: Looking at your feet. When you look down, you shift your center of gravity forward and lose the natural alignment of your head over your spine. Fix: Pick a spot on the wall at eye level and stare at it. If you are using a mirror, do not look at your feet - look at your reflection's eyes.
Mistake 2: Using the ball with shoes that have thick, cushioned soles. Balance requires sensory feedback from your feet. Cushioned shoes dampen that feedback. Fix: Wear minimalist shoes, barefoot socks, or go barefoot (if the surface is clean and safe). I have my clients train barefoot on the Bosu ball whenever possible.
Mistake 3: Rushing the progression. I have seen people go from flat-side double-leg to dome-side single-leg in one session. That is a recipe for injury. The nervous system needs time to adapt. The rule of thumb is: only advance when you can perform the current level with perfect form for 3 consecutive sessions without any loss of balance.
When to Stop Using the Bosu Ball (and What to Do Instead)
There comes a point where the Bosu ball stops challenging you. If you can hold a single-leg stance on the dome side for 30 seconds with eyes closed, you have likely maxed out its benefits for static balance. At that point, you need to move to more dynamic, unpredictable tasks. I recommend transitioning to a slackline, a BOSU Balance Trainer with resistance bands, or simply practicing on uneven terrain (hiking trails, grass, sand). The Bosu ball is a tool, not a destination.
For seniors and rehab patients, the Bosu ball may be useful for short periods (4-6 weeks) to build confidence, then it should be phased out in favor of functional exercises like stepping over obstacles, carrying objects, and changing directions. The goal is always transfer to real life, not mastery of the equipment.
Final Thoughts: A Tool, Not a Trick
The Bosu ball is one of the most effective balance tools I have used, but only when applied with a thoughtful progression. It is not a fad - it is a legitimate training tool that has been around for over 20 years for a reason. But it is also not a magic bullet. The downsides are real: injury risk, false sense of progress, and storage hassles. If you respect the progression, listen to your body, and integrate it into a broader program, you will see real improvements in your balance. I have seen a 78-year-old retiree go from being afraid to walk on uneven pavement to hiking a mile-long trail after 8 weeks of Bosu ball work. That is the power of consistent, safe, progressive training. Now go try it - but start on the flat side, keep your eyes on the wall, and breathe.