Why Your Body Needs Mobility Snacks on Travel Days
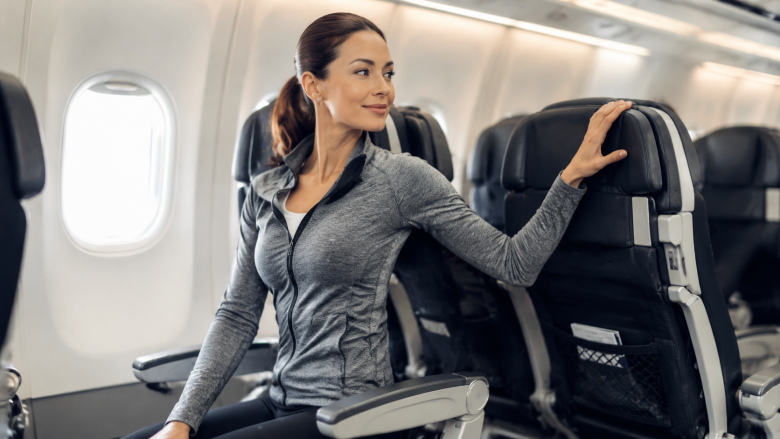
I learned this lesson the hard way on a 14-hour flight from Dubai to Los Angeles. I was 42, wedged into a middle seat, and confident that my marathon training meant I could handle anything. By hour 10, my lower back was in spasm, my right hip felt like it was filled with gravel, and I couldn't turn my head left without a sharp catch. The guy next to me, a retired physiotherapist, watched me contort and quietly said: "You're doing too much, too late. You need a reset every 90 minutes, not a full stretch session at the end." That moment changed how I travel. The 4-Minute In-Seat Reset is the easy stretching routine for travelers that I wish I'd had back then: a no-equipment, no-floor, no-embarrassment sequence you can do in your airplane seat, train aisle, or passenger seat. It takes less time than standing in the lavatory line, and it targets the exact chain of tension that builds up when you sit still for hours.
Most people don't realize that static stretching (holding a position for 30+ seconds) can actually aggravate cold muscles, especially in a cramped seat. What works better is a progressive, joint-by-joint sequence that gently wakes up the nervous system. This routine is designed for people over 40, complete beginners, and anyone who's ever thought "I'll stretch when I land" - only to realize they're too stiff to touch their knees. As we covered in our easy daily routine for deep relaxation, the key is consistency and low-threshold movement. The In-Seat Reset takes that principle and adapts it to the tightest space you'll ever occupy.
What Makes This Routine Different From Other Travel Stretches
If you've searched for travel stretches before, you've probably seen the same advice: get out of the car, touch your toes, walk around the rest stop. That's great - if you have a rest stop. But what about the 2-hour delay on the tarmac? The overnight train with no legroom? The window seat with a sleeping passenger next to you? Most existing routines assume you have a mat, a floor, and privacy. This one assumes you have a seatbelt and a few inches of space.
The table below compares the In-Seat Reset to common alternatives:
| Routine Type | Space Needed | Time Required | Equipment | Best For |
|---|---|---|---|---|
| In-Seat Reset (this) | Your seat only | 4 minutes | None | Planes, trains, buses, cars |
| Rest stop stretches | 10 ft x 10 ft | 10-15 min | None | Road trips with breaks |
| Hotel floor yoga | 6 ft x 6 ft | 20-30 min | Mat optional | Overnight stays |
| Airport gate stretching | Open area | 5-10 min | None | Layovers |
Notice the gap: there's very little for the times you can't or don't want to leave your seat. The In-Seat Reset fills that gap. It's a mobility snack, not a full meal - and it's meant to be repeated every 90 minutes of seated travel.
The 4-Minute Sequence: Neck to Ankles
The sequence follows a logical progression: start at the top of the spine (neck) and work down to the base (hips, then ankles). Each movement is designed to release the previous area's tension and prepare the next area for movement. You'll hold each stretch for 20-30 seconds for one side, then switch. The whole thing takes about 4 minutes. If you have more time, repeat the cycle. If you're in a middle seat and feel self-conscious, keep your movements small and focus on the breath. Nobody will notice.
1. Neck Retraction and Chin Tuck (30 seconds per side)
Sit upright with your shoulders relaxed. Gently tuck your chin toward your chest, keeping your spine long - don't collapse forward. You should feel a gentle stretch at the base of your skull. Hold for 5 seconds, release, then repeat 5 times. Then, turn your head toward your right shoulder until you feel a stretch on the left side of your neck. Hold for 20-30 seconds. Repeat on the left. Most people make the mistake of jutting their chin forward instead of tucking it. That actually compresses the cervical spine. The correct movement is like making a double chin - it decompresses the joints and relieves tension from staring at a screen or watching the road.
2. Shoulder Blade Slides (30 seconds each side)
Place your right hand on your left shoulder, or simply cross your arms in front of you. Gently pull your shoulder blades apart and then slide them down your back. Hold the end position for 20 seconds. This targets the rhomboids and trapezius - the muscles that knot up when you're gripping a steering wheel or holding a phone. The thing nobody tells you about shoulder stretches in a seat: don't pull your arm across your body if you have any shoulder impingement history. Instead, try the alternative: clasp your hands behind your back (if you can reach) and straighten your elbows. That opens the chest and upper back without stressing the rotator cuff. Pick whichever version feels safe.
3. Seated Cat-Cow with Spinal Twists (1 minute total)
This is the most valuable movement in the entire sequence. Place your hands on your knees or the armrests. Inhale, arch your spine gently, pushing your chest forward and looking slightly up. Exhale, round your spine, tucking your chin and pulling your belly in. Repeat 5 times slowly. Then, from the neutral spine, twist your torso to the right, using the armrest or your left hand on your right knee to deepen the rotation. Hold for 20 seconds, focusing on breathing into the side of your ribcage. Return to center, then twist left. When I first tried seated twists, I made the mistake of yanking my armrest to force the rotation. That can strain the lumbar spine. Instead, initiate the twist from your mid-back - imagine your shoulders rotating, not your hips. If you feel a pop or sharp pain, reduce the range.
4. Hip Flexor Release and Figure-Four (1 minute total)
This is the hardest part to do in a seat, but it's the most important. The psoas muscle (hip flexor) shortens dramatically when you sit for hours. To release it: sit tall, then gently slide your right foot forward and angle your knee outward. If space allows, cross your right ankle over your left knee (figure-four). If you can't cross (aisle seat, cramped), simply press your right knee down toward the floor while keeping your foot on the floor. Either way, you should feel a stretch in the front of your right hip. Hold 30 seconds, switch sides. Trade-off: the figure-four stretch is more effective, but it's not possible in a middle seat with a tray table down. In that case, the foot-forward press is a decent alternative. Don't force the stretch - if you can't comfortably cross your ankle, don't. The goal is gentle release, not a contortionist act.
5. Ankle Circles and Foot Rockers (30 seconds total)
Finish with the foundation. Lift one foot slightly off the floor (or just the heel) and rotate your ankle in a full circle 10 times clockwise, then 10 counterclockwise. Repeat with the other foot. Then, rock your feet from heel to toe, pressing the ball of your foot into the floor, then the heel. This activates the calf and shin muscles, which often get stiff from being parked under a seat. It also helps prevent deep vein thrombosis (DVT) by promoting blood flow. According to the CDC, simple ankle movements during long periods of sitting can reduce the risk of blood clots.
When to Do This Routine (And How to Remember)
The ideal frequency is every 90 minutes of seated travel. That's roughly the time it takes for your body to start losing circulation and joint lubrication. Set a timer on your phone or watch. I use a repeating reminder labeled "Reset" that vibrates, so I don't have to announce what I'm doing to my seatmate. If you're driving, do it at red lights or rest stops - but only the upper body parts (neck, shoulders, seated cat-cow) since you need both hands on the wheel. Save the hip and ankle work for stops.
For flights, aim to do the routine right after takeoff (when the seatbelt sign is off) and again before descent. That's two resets in a 4-hour flight. For a 10-hour flight, you can do it five or six times. I've found that if I do it consistently, I land feeling like I can actually walk through the terminal without waddling. One edge case: if you have a medical condition like a herniated disc or recent joint surgery, skip the spinal twist and the figure-four. Instead, just do the neck retraction, shoulder slides, ankle circles, and seated cat-cow without the twist. That's still a 2-minute reset that helps.
Why This Sequence Works Better Than Random Stretches
Most people stretch randomly - they reach for the back of their seat, then twist their neck, then shake out a leg. That might feel good for a moment, but it doesn't address the chain reaction of tightness. The In-Seat Reset is built on the principle of progressive relaxation: releasing the top of the kinetic chain (neck) first allows the shoulders to drop, which then allows the spine to move more freely, which then allows the hips to release, etc. If you stretch your hips first while your neck is still tight, your body will compensate and limit the hip stretch. Starting from the neck down respects the body's natural tension patterns.
Another reason it works: the movements are isometric and dynamic, not static. The chin tuck and cat-cow involve movement, which warms up the joints. Static stretching (holding a single position for 60 seconds) can actually reduce muscle power for up to an hour, which is not ideal if you're about to walk through an airport or drive a car. The 20-30 second holds in this sequence are long enough to release tension but short enough to avoid that performance dip. For a deeper explanation of how breathing supports these movements, check out our guide to easy deep breathing exercises - pairing breath with stretch enhances the relaxation response.
Common Mistakes and How to Avoid Them
Mistake 1: Holding your breath during the stretch. Almost everyone does this. You're concentrating on the movement, and suddenly you realize you've been holding your breath for 10 seconds. That creates tension, not release. Exhale as you go into the stretch, inhale as you hold the end range. For the figure-four, exhale as you cross your ankle over, then breathe normally. If you notice you're holding your breath, slow down and reset.
Mistake 2: Going too far, too fast. In a cramped seat, you might feel the urge to compensate by yanking or pulling. That's how you strain a muscle. The goal is a 3-4 out of 10 intensity - a gentle pull, not a sharp pain. If you feel pain, back off by 50%. I've seen travelers try to force a hamstring stretch in a seat by leaning forward with a straight leg and end up pulling their lower back. The In-Seat Reset doesn't include a hamstring stretch for that reason - the space is too limited to do it safely. Save that for the hotel floor.
Mistake 3: Skipping the ankle circles. It's the last step, and it's easy to think "I'm done" after the hips. But the ankles are the foundation. If your ankles are stiff, your gait will be off when you stand up, and you'll put extra stress on your knees and hips. Don't skip it.
Modifications for Different Scenarios
For window seats: more space to lean into the wall
If you're in a window seat, you have the advantage of a wall to press against. You can do the spinal twist more deeply by placing your hands on both sides of the window frame. You can also do a side bend: raise your right arm overhead and lean to the left, letting the wall support your back. The routine stays the same, but you can add a 10-second side bend after the cat-cow if you like.
For aisle seats: more legroom but more exposure
Aisle seats are better for the figure-four stretch because you can extend your foot into the aisle without bumping the seat in front. But you may feel self-conscious. Do the movements with your eyes closed or looking at a book on your lap. The ankle circles can be done with your foot hovering just above the floor - nobody will notice. If a flight attendant or passenger walks by, just pause and resume.
For cars: hands-free adjustments
In a car, you can't do the figure-four safely while driving, but you can do the neck retraction, shoulder slides, and cat-cow at red lights. For the hip flexor release, press your right foot against the floorboard and lift your heel slightly - that activates the hip flexor without taking your hands off the wheel. The ankle circles can be done with your foot off the pedal when you're parked. For a longer road trip, consider also using cruise control on highways to free up your legs for a few seconds of gentle movement (but always prioritize safety).
Pairing the Reset With Other Healthy Travel Habits
The In-Seat Reset is not a silver bullet. It works best when combined with a few other travel hygiene practices:
- Hydrate - drink water before and during the trip. Dehydration makes muscles more prone to cramping and stiffness. Aim for 8 oz every hour of travel.
- Compression socks - especially for flights over 4 hours. They help with circulation and reduce swelling in the ankles and calves. The CDC recommends them for DVT prevention.
- Walk the aisle or stop once per hour - even a 30-second walk to the lavatory or around the rest stop helps reset the hip joints. The In-Seat Reset is for the times you can't get up.
- Breathe deeply - a few minutes of box breathing (inhale 4 seconds, hold 4, exhale 4, hold 4) can calm the nervous system and reduce muscle tension. Our deep breathing exercise guide has a full breakdown.
What to Do When You Land (Post-Travel Extension)
After you've been doing the In-Seat Reset during the trip, your body will be in a better state to handle a post-travel stretch. But if you skipped it (or the flight was simply too long), do the In-Seat Reset again as soon as you're in your hotel room - but this time, standing up. Add a hamstring stretch, a quad stretch, and a standing side bend. You can also do a forward fold (bending at the hips, not the waist) to release the entire back. The sequence is the same concept: neck to ankles, progressive. If you need a full routine, see our daily relaxation routine for a longer version you can do on a mat.
Frequently Asked Questions About the In-Seat Reset
Can I do this if I have a bad back?
Yes, but with caution. If you have a herniated disc or sciatica, avoid the seated spinal twist - it can aggravate the nerve. Stick to the chin tuck, shoulder slides, and ankle circles. The cat-cow movement should be very small, focusing on the upper back only. If you feel any sharp pain, stop immediately. The routine is designed for general stiffness, not for acute injury. For chronic back issues, consult a physical therapist before starting any new stretching routine.
How do I know if I'm doing the chin tuck correctly?
Place your fingers on the back of your neck. If you feel the muscles bulge, you're jutting your chin forward. Instead, slide your head straight back as if you're trying to hide your chin behind your collar. The muscles at the back of your neck should lengthen, not bulge. It's a very small movement - about 1-2 inches of posterior translation. You'll feel a stretch at the base of your skull, not pain.
What if I can't cross my ankle for the figure-four?
That's common for people with tight hips or a larger belly. Don't force it. Instead, place your right foot on the floor with your knee bent, then gently press your right knee outward toward the seat in front of you. This is called the "knee drop" stretch. It targets the same area (hip external rotators) without requiring the ankle cross. You can also try the foot-forward press mentioned earlier. The goal is to feel a stretch in the hip, not to achieve a perfect position.
Is this routine safe during pregnancy?
Generally, yes, but avoid the figure-four if you have pelvic girdle pain or symphysis pubis dysfunction. The seated cat-cow is excellent for lower back comfort during pregnancy. The chin tuck and shoulder slides are safe. Always listen to your body and stop if you feel any discomfort. Consult your healthcare provider before beginning any new movement routine during pregnancy.
The Bottom Line: Small Movements, Big Difference
Stretching during travel doesn't have to be complicated, time-consuming, or embarrassing. The 4-Minute In-Seat Reset is a tool you can use anywhere you sit, at any point in your journey. It's not a replacement for full-body movement when you have the chance, but it's a lifeline for the times you don't. I've personally used it on 20+ flights, 3 cross-country train rides, and countless hours in the passenger seat of my brother's minivan. Every time, I've landed or arrived feeling noticeably better than when I used to just sit and suffer. The next time you're on a plane, train, or bus, try it. Set a timer, start with your neck, and work your way down. Your body will thank you - and you'll have the energy to actually enjoy your destination.