Why Side Plank Might Be Easier Than You Think (and Better for Beginners)
When I first started teaching core work, I assumed the standard plank was the gold standard for everyone. But after watching dozens of beginners struggle with wrist pain, sagging hips, and that dreaded trembling in the first ten seconds, I realized something: the side plank is often the smarter starting point. It's not a consolation prize-it's a strategic entry point that builds rotational stability without overwhelming your joints. In fact, for many people, the side plank is actually easier than a front plank, especially if you have wrist issues or a weak lower back.
Let me show you why, and then I'll walk you through the exact progression I use with clients so you can build a rock-solid side plank without injury.
Are Side Planks Good for Beginners? (Spoiler: Yes, If You Do It Right)
Absolutely-but only if you start with the right variation. The biggest mistake I see is people jumping straight into the full straight-leg side plank, expecting to hold it for 30 seconds. That's like trying to run a marathon before you can walk. The side plank is excellent for beginners because it targets the obliques, deep transverse abdominis, and the glute medius-muscles that are often neglected in traditional front planks. And because your body weight is supported by one arm and the side of your foot (or knee), the load is distributed differently, reducing the pressure on your wrists and shoulders.
However, the key is progression. If you jump into the advanced version too soon, you'll likely compensate by arching your lower back, dropping your hip, or cranking your neck. Those compensation patterns can actually weaken your core over time. So start with the kneeling version, and only move up when you can hold perfect form for 20 seconds without shaking.
What Is the Easiest Side Plank for Beginners? The Kneeling Side Plank
The easiest side plank is the kneeling side plank (also called the bent-knee side plank). Here's exactly how to set it up:
- Lie on your right side with your legs stacked. Bend your knees to a 90-degree angle and bring them slightly forward so your thighs are at about 45 degrees to your torso.
- Place your right forearm on the floor directly under your shoulder, fingers pointing forward. Your elbow should be aligned with your shoulder joint.
- Engage your core (imagine someone is about to poke you in the belly) and lift your hips off the floor until your body forms a straight line from your head to your knees.
- Hold for 10 seconds initially, then gradually work up to 20 seconds. Switch sides.
This version removes the load from your feet and reduces the lever arm length, making it much easier to maintain proper alignment. Most people can hold this for 15-20 seconds on their first try. If you can't, drop to your forearm and keep your bottom knee on the floor-that's the modified kneeling side plank, which is even easier.
How Do I Know If I'm Doing a Side Plank Correctly? The Form Check Checklist
This is the most common question I get, and it's the one most articles gloss over. They just say "keep your body straight"-but what does that actually feel like? Here's a concrete checklist I use with my clients:
- Hip check: Your bottom hip should not be sagging toward the floor. If it drops, you're either not engaging your obliques or your core is too tired. Drop to a lower variation (knees down or bent knee) immediately.
- Shoulder stack: Your bottom shoulder should be directly under your elbow or hand. If your shoulder rolls forward or backward, you lose stability. Think of pushing the floor away from you to create space in the shoulder joint.
- Neck alignment: Your head should be in line with your spine. Don't look up at the ceiling or down at your belly-keep your gaze forward or slightly down, like you're looking at a spot on the wall about 6 feet away.
- Breath: Breathe steadily. Most people hold their breath without realizing it. If you're holding your breath, your core is actually working against itself. Inhale through your nose, exhale through your mouth, and keep the exhale long and controlled.
- Feet position: In the straight-leg version, your feet should be stacked or one slightly in front of the other for stability. In the bent-knee version, your knees should be stacked or slightly offset.
If you can tick all five boxes, you're doing it correctly. If you can't hold for more than 5 seconds without dropping your hip, go back to the kneeling version. There's no shame in that-it's how you build strength safely.
Is Side Plank Harder Than Plank? The Honest Answer
Short answer: It depends on the person. For most beginners, the side plank is easier on the wrists and shoulders because the load is carried by your forearm (or hand) and the side of your foot, not both hands and both feet. In a standard plank, your wrists take about 50% of your body weight, which can be painful if you have weak wrists or carpal tunnel issues. The side plank reduces that load to about 25% per arm (since you're using one arm at a time).
But-and here's the thing nobody tells you-the side plank is actually harder for your obliques than a front plank. In a front plank, your rectus abdominis (the six-pack muscle) does most of the work. In a side plank, your obliques and glutes have to work much harder to prevent your hips from rotating. So if you have weak lateral core muscles, you'll find the side plank more challenging. The good news is that with consistent practice, you'll see rapid improvements in balance and rotational stability.
If you're tracking your plank progress, you might also be interested in how many calories you're burning. While planks are not high-calorie burners, they are fantastic for building core endurance. For a rough estimate, check out our Plank Calories Per Session Calculator to see how your side plank holds up.
3 Common Mistakes Beginners Make (And How to Fix Them)
Here are the three mistakes I see most often, along with the exact fixes:
Mistake 1: The Sagging Hip (The Most Common)
When you lift your hips, you need to engage your obliques and glutes. If your hip drops, you're essentially hanging off your shoulder joint, which can lead to shoulder impingement. Fix: Imagine you're balancing a glass of water on your hip. Squeeze your glute and pull your bottom rib down toward your hip. If you can't hold it, drop to your knees.
Mistake 2: The Rolled Shoulder
Many beginners let their bottom shoulder roll forward, which puts stress on the rotator cuff. Fix: Before you lift, pull your shoulder blade down and back, like you're trying to tuck it into your back pocket. Keep your chest open, not collapsed.
Mistake 3: Holding Your Breath
I've seen people turn purple from holding their breath while holding a side plank. It's a natural response to tension, but it sabotages your core stability. Fix: Exhale as you lift your hips, then breathe normally. If you find yourself holding your breath, lower the difficulty (e.g., go to knees) until you can breathe freely.
Progression Ladder: From Kneeling to Full Side Plank
Here's the exact timeline I recommend for my clients. Don't rush-listen to your body.
- Week 1-2: Kneeling side plank (both knees bent on floor, forearm support). Hold for 10-15 seconds per side, 3 sets. Rest 30 seconds between sides.
- Week 3-4: Bent-knee side plank (bottom knee on floor, top leg straight, forearm support). Hold for 15-20 seconds per side. Aim for 3 sets.
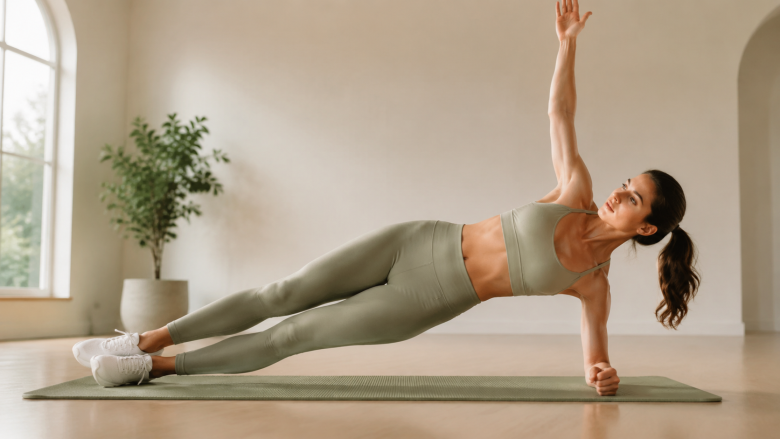
- Week 5-6: Straight-leg side plank (both legs straight, feet stacked, forearm support). Hold for 10-15 seconds initially, then build to 20-30 seconds. If you feel your hip dropping, go back to bent-knee.
- Week 7+: Full side plank with hand support (straight arm, full straight legs). Hold for 20-30 seconds. This is the advanced version-most people don't need to go beyond this for general fitness.
Most people can progress from kneeling to straight-leg in about 6 weeks if they practice 3-4 times per week. But if you have a history of shoulder or hip issues, take it slower. Strength comes with consistency, not speed.
Side Plank vs. Front Plank: Which Is Better for Core Stability?
Both are valuable, but they target different aspects of core stability. The front plank is great for building endurance in the rectus abdominis and lower back. The side plank, on the other hand, trains your frontal plane stability-the ability to resist lateral bending forces. This is crucial for sports like tennis, basketball, or even carrying groceries. If you only do front planks, you're leaving your obliques underdeveloped.
For beginners, I recommend alternating between the two: two days of front planks, two days of side planks (each side), and one day of rest. This balanced approach ensures you're building a well-rounded core. And if you're curious about the calorie burn difference between the two, our Running Calories For Beginners Calculator can give you a general idea of how much energy different exercises consume, though planks are generally low-calorie.
The Thing Nobody Tells You About Side Planks
Here's the insight I wish someone had shared with me when I started: Side planks are not just about the hold time. The quality of the hold matters far more than how long you can hold it. A 10-second perfect side plank is more effective than a 30-second shaky, sagging one. So don't chase numbers-chase alignment.
Also, most people don't realize that the side plank can be a great tool for fixing hip imbalances. If you have a weak glute medius on one side (common in runners and people who sit a lot), the side plank will expose it immediately. The weaker side will feel much harder to hold. That's normal-just spend extra time on that side, but don't overdo it. Start with the same duration as your strong side, and gradually increase.
When to Listen to Pain vs. Discomfort
It's normal to feel a burning sensation in your obliques or glutes-that's the muscle working. But if you feel sharp pain in your shoulder, wrist, or hip joint, stop immediately. That's a sign of improper form or an underlying issue. For example, if your wrist hurts in the straight-arm side plank, switch to the forearm version. If your shoulder hurts, check your alignment-your shoulder should be stacked directly over your elbow or hand, not behind it.
If you experience persistent pain, consult a physical therapist. The side plank is a safe exercise for most people, but everyone's body is different. And if you're looking to complement your core work with better nutrition, our guide on Helpful Tips for Light Healthy Eating Beginners can help you support your recovery and energy levels.
Frequently Asked Questions (Answered Naturally)
Let me address a few more common questions that didn't fit neatly above.
Can I do side planks every day?
Technically yes, but I don't recommend it. Your core muscles, like any other muscle group, need time to recover. Doing side planks 3-4 times per week is plenty for building strength. Daily practice can lead to overuse injuries, especially in the shoulder stabilizers.
Should I do side planks on both sides equally?
Yes, absolutely. Always do the same number of holds or time on each side. If one side feels significantly weaker, start with the weaker side first (while you're fresh) and match the duration on your strong side. Over time, the imbalance will correct itself.
What if I can't even hold the kneeling side plank for 5 seconds?
That's okay-start with the modified kneeling side plank where you keep your bottom knee on the floor throughout the entire hold. Even a 5-second hold is progress. Do 3 sets of 5-second holds, and gradually increase to 10 seconds over a week or two. You'll get there.
Putting It All Together: Your First Week Side Plank Routine
Here's a simple routine you can do at home, no equipment needed:
- Day 1: 3 sets of 10-second kneeling side plank (each side). Rest 30 seconds between sides.
- Day 2: Rest or light walking.
- Day 3: 3 sets of 15-second kneeling side plank (each side).
- Day 4: Rest.
- Day 5: Try bent-knee side plank for 10 seconds (each side). If you can't, go back to kneeling.
- Day 6: Rest.
- Day 7: Active recovery-light stretching or yoga.
After one week, reassess your form using the checklist above. If you can hold the kneeling side plank for 20 seconds without sagging, move to the bent-knee version. If not, stay at kneeling for another week. Patience is your friend here.
Final Thoughts
The side plank is a powerful, beginner-friendly exercise that too often gets overshadowed by its flashier cousin, the front plank. But when done correctly, it builds a foundation of lateral stability that protects your spine and improves your balance. Start with the kneeling version, use the form checklist, and progress slowly. Your obliques will thank you.
And if you ever find yourself in the mountains and want to track your calorie burn during a hike, our Mountain Calories For Beginners Calculator can help you estimate your energy expenditure. But for now, focus on those 10-second holds. They matter more than you think.