Why the Lunge Is Harder Than It Looks (And Why That's Okay)
When I first tried a lunge, I tilted like a falling tree. My front knee ached, my back hip felt stuck, and I couldn't hold the position for more than three seconds without wobbling. I assumed I was just uncoordinated. But the truth is simpler: the lunge isn't a single move - it's a skill that requires ankle mobility, hip flexibility, and balance. Most beginners struggle because they skip the foundation work.
This guide is built on that reality. Instead of just showing you a picture of a perfect lunge, I'll walk you through the three regressions that address the real reasons you might be struggling. By the end, you'll not only know how to do a proper lunge for beginners - you'll have a self-check system to know you're doing it right, and a clear path to progress.
The Real Culprits: Ankle Mobility, Tight Hips, and Balance
Before you even step into a lunge, it helps to understand why it feels awkward. The lunge demands that your front ankle dorsiflex (bend your toes toward your shin) enough to let your knee travel forward without your heel lifting. Many people, especially those who sit a lot, have stiff ankles. If your ankle can't move, your body compensates by leaning forward or twisting - and that's when pain shows up.
Similarly, the back hip needs to extend (open up) and the hip flexor on that side must loosen. If your hip flexors are tight from sitting, your back leg won't be able to straighten fully, tipping your pelvis forward and straining your lower back. And balance? That's just a confidence issue - your brain has never asked your legs to do this split-stance thing before, so it panics.
Most people don't realize that the lunge is actually two separate movements happening at once: a forward knee bend AND a backward hip extension. If you only focus on the front leg, you miss half the equation. The thing nobody tells you about lunges is that the back hip is the real driver of stability. When you learn to extend the back hip actively, everything else falls into place.
The Three Regressions: Find Your Starting Point
Instead of struggling with a full lunge, start at the level that matches your current mobility and balance. These three regressions answer the common PAA question: "What is the easiest type of lunge to do?" The answer depends on your specific limitation.
Regression 1: The Supported Split Squat (Easiest for Balance)
If you feel wobbly or fear falling, this is your starting point. Stand next to a sturdy chair, countertop, or wall. Place one foot forward and one foot back, about hip-width apart. Hold the support with one or both hands. Bend both knees until your back knee hovers just above the floor, then press back up. That's it - no forward movement, no walking. The support takes care of balance so you can focus on form.
This is the easiest type of lunge to do if balance is your main block. It's also great for anyone recovering from injury or dealing with knee sensitivity, because you can control the depth precisely. Aim for 3 sets of 8-10 reps per side, going as deep as comfortable without pain.
Regression 2: The Box Lunge (Easiest for Ankle Mobility)
If your front heel lifts off the ground when you try to lunge, you likely have limited ankle dorsiflexion. The box lunge gives your ankle a break. Place a low box or step (about 6-12 inches high) behind you. Step forward with one foot so your back foot rests on the box. Now lower your back knee toward the floor. Because your back foot is elevated, your front ankle doesn't need as much range of motion. This lets you practice the lunge pattern without the ankle restriction.
Most people find they can go deeper and feel more stable with this regression. Once you can do 3 sets of 10 reps per side without your heel lifting, your ankle mobility is probably ready for a standard lunge. If not, continue with ankle mobility drills (like calf stretches and ankle circles) between sessions.
Regression 3: The Static Hold with Hip Extension (Easiest for Tight Hips)
If your lower back aches or you feel a pinch in the front of your back hip, your hip flexors are too tight. This regression isolates the hip extension part of the lunge. Stand in a split stance (feet hip-width apart, front foot forward, back foot back). Without bending your front knee much, gently squeeze your glute on the back leg and push your back hip forward. You'll feel a stretch in the front of your back hip. Hold for 5-10 seconds, then release. Do 5-8 reps per side.
Once you can comfortably extend your back hip without pain, add a small knee bend on the front leg. Over time, you'll build the range of motion needed for a full lunge. This is a hidden gem - most beginner guides skip it entirely, but it's the key to pain-free lunges for people with desk jobs.
How to Do a Proper Lunge Step by Step
Once you've practiced the regression that fits your needs, you're ready to try the standard lunge. Here's the exact sequence I use with every beginner I coach.
- Start tall. Stand with feet hip-width apart, shoulders relaxed, hands on hips or by your sides. Engage your core gently - imagine someone is about to tap your belly button.
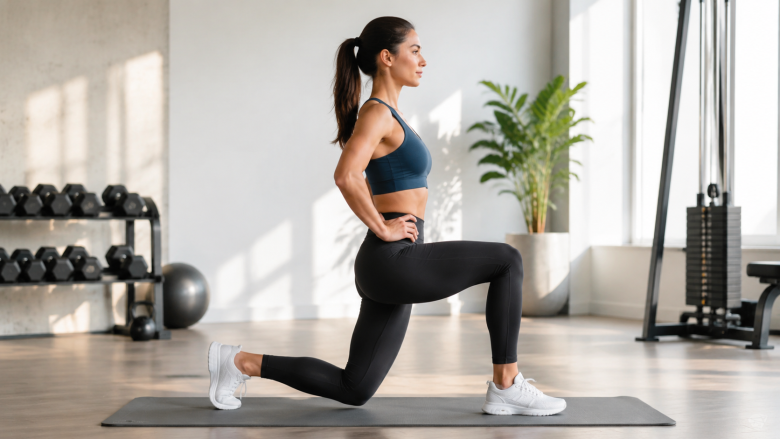
- Take a controlled step forward. Step forward with one foot, landing heel first. Your front foot should be about two to three feet ahead of your back foot. The exact distance varies by height, but aim for a position where your front shin is vertical when you kneel.
- Lower your back knee. Bend both knees simultaneously. Keep your front knee tracking over your mid-foot (not past your toes, not too far back). Your back knee should hover just above the floor - do not let it touch the ground hard. Your back heel will lift naturally; that's fine.
- Check your back hip. As you lower, think about pushing your back hip forward. This keeps your pelvis neutral and prevents your lower back from arching. If you can't feel that stretch, you're probably not extending enough.
- Press through the front foot. Drive through your front heel to stand back up. Don't push off the back foot. Imagine you're leaving a footprint in the sand with your front heel.
- Reset and repeat. Bring your back foot forward to meet the front foot, then step with the other leg. Or do all reps on one side before switching.
That's the basic movement. But the real question is: how do you know if you're doing it correctly? Let's get specific.
How to Know If You're Doing Lunges Correctly: A Self-Check System
This section directly answers the PAA question "How do I know if I'm doing lunges correctly?" Use these five cues as a mental checklist every time you lunge. If you can check all five, your form is solid.
- Front knee stays over the mid-foot, not past the toes. Look down at your front foot. Your knee should be directly above the middle of your foot - not in front of your toes, not behind your heel. If it's too far forward, you're putting stress on your knee. If it's too far back, you're not using enough range of motion. A helpful trick: imagine a vertical line from your kneecap to the floor. It should land right around the laces of your shoe.
- Back hip extends actively. Your back leg should be straight (not locked) and your back hip should feel a gentle stretch. If your back hip feels tight or your lower back arches, you're not extending enough. Squeeze your back glute to push the hip forward.
- Torso stays upright. Don't lean forward or backward. Your chest should be up, shoulders back. If you lean forward, you're likely compensating for weak glutes or tight hips. If you lean back, you're probably lacking core stability.
- Both feet stay flat (front foot entirely, back foot on toes). Your front foot should be fully planted - heel, ball, toes. If your front heel lifts, your ankle mobility needs work. Your back foot should be on the ball of the foot, with the heel naturally off the ground. If your back foot slides or collapses inward, your balance is off.
- Weight is evenly distributed between front and back. A common mistake is putting 80% of your weight on the front leg. In a proper lunge, it should feel more like 60% front, 40% back. The back leg is helping stabilize, not just along for the ride. Test this by trying to lift your front foot slightly - you should be able to hold the position for a second without falling.
I often tell beginners: if you can't hold the bottom position of a lunge for a full five seconds with good form, you're not ready to do dynamic reps. Slow down. Use a wall or chair for support. The goal is control, not depth.
Common Mistakes and How to Fix Them
Even with good cues, mistakes happen. Here are the most frequent ones I see and exactly what to do about them.
Mistake 1: Front Knee Travels Past the Toes
This is the classic "lunge hurts my knees" issue. It usually happens when you step too short or your ankle mobility is limited. Fix by stepping out a little farther - your front shin should be vertical at the bottom. If stepping farther makes you feel unstable, return to the box lunge regression until your ankle opens up.
Mistake 2: Back Knee Drops Too Fast or Slams the Floor
Controlled lowering is key. If you drop like a rock, you're not engaging your muscles. Imagine you're trying to lower your back knee onto a raw egg - you want to hover just above it. Slow down the eccentric (lowering) phase to 3-4 seconds. This builds strength and stability.
Mistake 3: Upper Body Leans Forward
Leaning forward often comes from weak glutes or tight hip flexors. Your body is trying to use your back muscles to compensate. Fix by doing the static hold with hip extension before your lunges. Also, practice keeping your chest proud and your hands behind your head (this automatically prevents leaning).
Mistake 4: Wobbling or Losing Balance
Wobbling is usually a core stability issue, not a leg strength issue. Reduce your step length - a shorter stance is more stable. Use a wall or chair for light support. Also, engage your core before you move: take a deep breath, brace, then lunge. As you get stronger, balance will improve naturally.
Mistake 5: Heel Lifts on the Front Foot
As mentioned, this is an ankle mobility problem. Don't push through it. Instead, use the box lunge and add daily ankle mobility drills: seated calf stretches, ankle alphabet (drawing the alphabet with your foot), and kneeling ankle rocks. In a few weeks, you'll likely see improvement.
Progressions: From Beginner to Confident Lunge
Once you can do 3 sets of 10 standard lunges per side with good form (no wobbling, no pain, all five self-checks passed), you're ready to progress. Here are three natural next steps.
- Walking lunges. Instead of stepping back to start, step forward with the opposite leg and continue walking across the room. This adds momentum and requires more dynamic balance. Start with short distances - 10-15 steps per leg.
- Reverse lunges. Step backward instead of forward. This changes the load on your knees and glutes and is often easier on the knees for some people. It's also a good way to vary your routine.
- Weighted lunges. Hold a dumbbell in each hand, or a kettlebell in goblet position. Add weight only when you can do 12 reps per side with perfect form. Start with 5-10 pounds and increase slowly.
Remember, the lunge is a skill, not a race. I've seen people spend months on the supported split squat before they felt ready for standard lunges, and that's completely fine. The goal is to move well, not to move fast.
Putting It All Together: A Sample Beginner Routine
Here's a simple routine you can do 2-3 times per week, on non-consecutive days. It takes about 15 minutes.
- Warm-up (3 minutes): 10 ankle circles each direction, 10 leg swings (front-to-back and side-to-side), 10 hip circles.
- Regression work (5 minutes): Choose the regression that matches your biggest limitation. Do 3 sets of 8-10 reps per side. If you're not sure, start with the supported split squat - it's the easiest and safest.
- Standard lunge practice (5 minutes): If you can do the regression without pain, try 2-3 sets of 5-8 standard lunges per side. Use a wall or chair for balance if needed. Focus on the self-check cues.
- Cool-down (2 minutes): Hold a deep lunge stretch (front knee bent, back leg straight, hands on front thigh) for 30 seconds per side. Then do a standing quad stretch for 30 seconds per side.
After four weeks, reassess your mobility and balance. You might find that you can drop the support or increase the rep count. If you're tracking your progress and want to see how lunges fit into your overall calorie burn, you can use our Running Calories For Beginners Calculator to estimate energy expenditure during dynamic lunges or walking lunges. For a more general sense of energy use during outdoor activities, the Mountain Calories For Beginners Calculator can give you a baseline for hiking with lunges-like movements (like stepping up on uneven terrain).
When to See a Professional (And When Not to Worry)
Lunges can cause discomfort, but not all discomfort is bad. A gentle stretch in the back hip or front thigh is normal. Sharp pain, clicking in the knee, or numbness in the foot is not. If you experience any of those, stop and see a physical therapist or qualified coach. That said, most beginner issues resolve with the regressions above. Don't be afraid to use a support - even professional athletes use box lunges in their warm-ups.
One more thing: the lunge is a fantastic exercise for building functional strength, but it's not a magic bullet. Pair it with a balanced program that includes squats, hinges, pushes, and pulls. And if you're working on your overall health, don't forget that nutrition plays a role. Our Helpful Tips for Light Healthy Eating Beginners can help you fuel your body for better recovery and energy.
Final Thoughts: The Lunge Is a Conversation With Your Body
I've been doing lunges for over a decade, and I still check my cues. Some days my hips feel tight, and I go back to the static hold. Other days my balance is off, and I use a wall. That's not failure - that's listening. The lunge is a skill that evolves with your body. The more you practice with awareness, the more you'll learn about your own mobility and strength.
You don't need to be perfect on day one. You just need to start where you are. Use the regressions, run through the self-checks, and give yourself permission to progress slowly. That's how you do a proper lunge for beginners - not by copying a picture, but by building the skill from the ground up.